

Cheap Easy 600°C Furnace
A small, cheap, furnace to hold 600 degrees Celsius to train shape-memory NiTi wire (nitinol).
Overview

I wanted to train nickel titanium wire (aka nitinol, niti wire) to alter its shape memory properties and needed a small chamber to hold up to 600 degrees Celsius to do so. Came up with this as an easy and cheap option while still having good insulation and ease of use.
The heart of it is a small chamber (think soup can) wrapped with electric heating element (directly AC connected, so be safe). Placed in a larger metal cylinder with perlite ($5) poured around it. I made a thermostat / controller for it which switches a relay and has a physical interface as well as web UI… but if that’s overkill and too fancy for you, then just flick on and off a surge protector and feel your way to the desired temperature.
Materials
| Item | Quantity |
|---|---|
| Perlite | Gardening medium for the main insulation. $5 for 8 quarts at hardware / garden supply store. |
| Metal bucket | Main outer container. Alternative: metal paint can |
| Vent pipe adapter | For inner chamber. Alternative: soup can, vent pipe with end caps |
| Furnace cement & Fireplace mortar | To glue and hold bits together - maybe optional. |
| Nichrome wire | Heating element. Scavenged from hair dryer or similar |
| AC plug / wires / fiberglass wire sheath | To power heating element. Scavenged from same hair dryer |
| Mica sheets | To insulate outside of the chamber. Scavenged from same hair dryer |
| K-Type thermocouple | Few bucks from Aliexpress, with sensor module |
| Electronics | ESP32 / Relay module / Wall outlet / Other optional parts |
| Picture hanging wire | For holding stuff together. Alternative: steel tie wire, stripped copper wire |
| Crimp connectors | To make electrical connections. Can’t use solder, heatshrink, etc. |
The Inner Chamber
The inner chamber is a metal cylinder, a vent pipe adapter in my second version, with an attached bottom cap. The items you are baking can lay there or hang by wire from the lid which is loosely placed on top. If the item has been galvanized, you’ll need to burn off the zinc layer first - do so outside and avoid those fumes.

On my first version (left) I used fireplace cement both to insulate the container and hold it in place. This is probably an unnecessary expense as a mica sheet should do better to insulate and can be scavenged from hair dryers and similar (or a few bucks on Aliexpress). Wrap them around the sides of the chamber. I used the fireplace cement here again as a glue, but you could tape the sheet at first and then remove the tape after you’ve wrapped the nichrome wire around. You’ll have to get creative with steel wire to get the nichrome to stay in place… a steel wire wrapped around can touch the nichrome at one point, but if it touches multiple then that section of nichrome will be bypassed and the steel will heat up and melt.
Anchor one end of the wire at the bottom of the cylinder. Wrap tightly in a spiral going upward, keeping uniform spacing so no two loops touch. Anchor the top end once you’re satisfied with spacing
Temperature sensor:
Most common probe here is a k-type thermocouple, can be sold with the reader module. They are often sold with metal braided sheath so it can survive these temperatures. If you aren’t building the ESP32-C3 controller part of this then you’ll need a dedicated device to read the thermocouple - certain multimeters can do it. I mounted my sensor inside the can on the bottom, near but not touching the edge.
Electrical Connections
If scavenging from a hair dryer you will acquire three useful things: the nichrome wire, the AC power cable, and the mica sheet. Whether there’s enough mica sheet there for you just depends. The plug obviously will go into the outlet, but on the other end keep as much of the wire with fiberglass insulation as you can. This part of the wire will be able to take the heat buried in the perlite and connected to the nichrome.
No solder or heatshrink can be used here - you need crimp connectors. Just the metal barrel type for these inline connections but you can cut the barrel off of the ubiquitous red/blue/yellow crimp connectors you probably already have. If you want to go rogue, I guess just twist the hell out of the wires to merge them but you can’t add heatshrink to keep them together for the part that connects to the nichrome.
Managing Wattage:
The length and diameter of nichrome you use determines how much power draw… you want to aim to get as much length of the nichrome as you can fit around the chamber. For my wire, after pulling out two separate lengths of it and crimping them together in series, I was able to fit about 32 Ohms worth of it around the cylinder.
120V ^ 32 Ohms = 3.75 Amps. 120V * 3.75A = 450 Watts. So I can expect about 450 Watts, but I will use a diode inline and this will halve the AC voltage. Too much and the wire will burn itself up - remember it is hotter always than the thermocouple is reading especially after being on for awhile continuously.
On my first version I kept burning up my element until I got the current down to about 250 Watts, so stay below that. If you want true control, you can probably use a triac (dimmer switch) and just set it manually.
If you think you’re cutting it close, your control solution should implement a duty cycle (x seconds on, x seconds off). The wire will heat up quickly and only after a period of latency will it reach the thermocouple - aka the wires are always hotter than you are reading and can be A LOT hotter, enough to burn up, if you aren’t taking it slow enough.
Controller
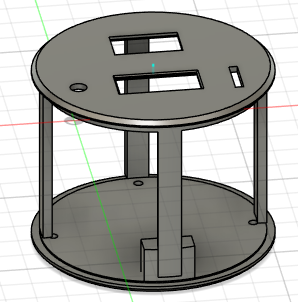

The controller is built around an ESP32-C3, relay, oled, push buttons, thermocouple sensor, and USB 5v charger. I looked around the room and decided to mount it in the center of an empty filament spool. When stored, the AC and sensor wires can be wrapped around the spool.
The sensor plugs into an audio jack, and the heating element plugs into the AC outlet. Up, down, and center push buttons control the output and the control mode. The firmware is still being debugged but the idea was to use a ramping algorithm over several setpoints so it can eliminate overshoot by the time it gets to your final temperature.
And we’re using an ESP32-C3 so of course the controller has a web front end, because why not. The code is prototype with some bugs, but if you want to see it, you can find that and the 3D model files here: https://github.com/DaverDavids/ESP32-Thermostat
First Run

Pour some perlite into the outer bucket, then set the chamber in the middle. If you’re baking something, this is where you’d place it in the chamber or hang it from the lid with steel wire. Place the lid on top and fill the rest of the bucket with more perlite. Let the AC and thermocouple wires drift away from the chamber and come up and out of the bucket. If you aren’t properly insulated here, don’t let the wires short to each other on the chamber or bucket.
Now you can fire up the heating element any way you’ve decided, and watch the temperature rise. Anything that has plastic coating, adhesive residue, or other crap on it will burn up as it heats up, so have some ventilation at this point. Eventually it will all be gone.
Nitinol “Training”
It’s a bit obscure the exact, or varying, procedures to get the best result. But you should hold the wire above 400 deg C and above 600 deg C for 1 hour plus… the exact times and temperatures, plus complex operations like giving it heating and cooling cycles repeatedly, is still a mystery to me. You probably can’t go wrong holding it at about 420 deg C for 1 hour or more, so start there.
| Color Marker | Temps | Notes |
|---|---|---|
| black | over 500C for hours, 580 peak for maybe one hour | Good result |
| green | 500C for 30 minutes+ | works okay - doesn’t go back as far to original size |
| red | 600C for 30 minutes | bad - stretches easier but remains stretched mostly |
| yellow/green | 420C for ~6 hours | works well, stretches pretty easily and returns back mostly |
| red/yellow (unmarked in pics) | 400C for 30 minutes | very good, similar to yellow/green. |
If the wire is already in the shape you want it to return to later, then just put it in your chamber and go. If you want to set the shape yourself, you have to bend the wire and find a way to hold it in place. The super-elastic form of the niti wire is.. well… very very strongly elastic. Hard to bend and hold in that shape. If you’re making your own spring, for example, you’d have to fix the wire on one end of a steel bar, twist it around painstakingly, and then fix it at the end. Remember you can only use metal in here, or other stuff that survives 400-600 deg C.
It’s sometimes mentioned that quenching the metal quickly afterwards helps keep its properties. We suspended our wire from the removable lid for just this reason. When we power off and uncover the chamber, we can easily lift the lid with a pair of pliers and quickly dunk the hanging wire into a mug of water.
Results
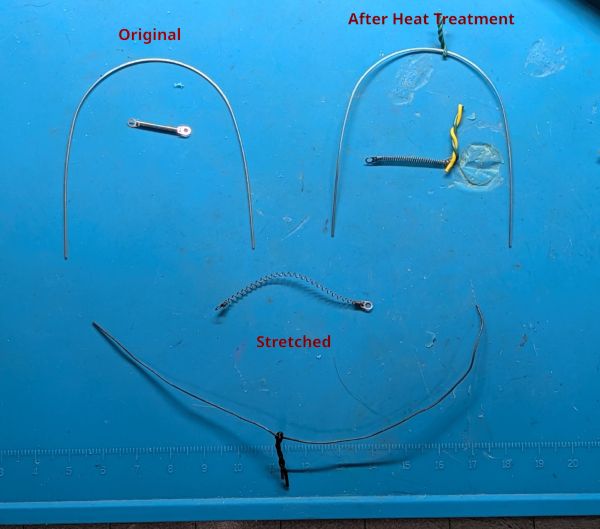
Immediately after the process, the wire will be slightly (or a lot depending on temperature) darker than when it went in. Now when you deform it, it will stay in that position easily. Hold a lighter up to each section of it and it will twist and writhe around back into its previous shape.
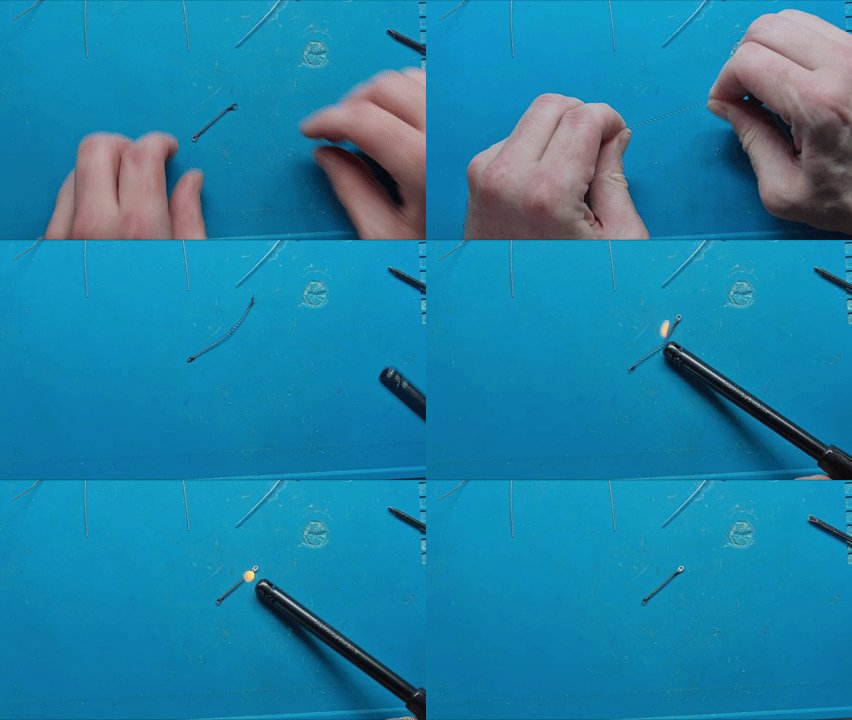
The effect looks cool on its own, but it’s also surprisingly strong. I was able to pull at least 1 pound (2.2kg) of weight using one of the tiny springs. It springs up quickly, and then immediately starts lowering back down. That makes sense because the wire begins instantly cooling off below the activation temperature. Don’t hold the lighter there continuously or you will cook the wire well over 600 deg C and it will permanently deform again.
Here is a clip of this in action:
Is It Useful?
Nitinol is cool looking, but is it useful? In industry it seems there are a few niche applications where it solves a uniquely suited problem. My idea is to use it as an electronic lock actuator with smallest size and parts. Simply passing a current through the wire itself will heat it and cause a mechanical movement without extra moving parts… aka motors or solenoids (uses coils of wire around a core, always slightly bulky). I originally wanted to use this for my CandyLock project, but I decided to finish that project with a traditional solenoid before this furnace and wire was ready. So look forward to a v2 of the CandyLock when I figure out the best mechanical design for a memory spring activated mechanism.